
AEWS 스터디에서는 AWS의 관리형 Kubernetes인 Elastic Kubernetes의 다양한 기능들을 실습해보면서 익혀본다. 이 글은 스터디를 참여하면서 학습한 내용을 정리하는 연재 글이다. 스터디 진도에 맞춰 글을 작성한다.
이 글에서는 Instance Store을 사용한 EKS Instance StorePersistent Volumes과 NodeGroup 추가에 대해서 알아본다.
1. Amazon EC2 인스턴스 스토어

일부 머신 타입에서는 인스턴스에 블록 수준의 임시 스토리지를 제공한다. 스토리지는 호스트 컴퓨터에 물리적으로 연결된 디스크에 위치하여 IOPS가 매우 빠르다.
2. c5d.large 신규 노드 그룹 생성 및 확인
기존 노드 그룹은 그대로 놔두고 새로운 노드 그룹에 하나의 인스턴스만 추가로 만들게 된다. nvme-cli 관련 툴 설치, 파일 시스템 생성 및 마운트, etc 탭에 정보 넣는다.
|
1
2
3
4
5
6
7
8
9
10
11
12
13
14
15
16
17
18
19
20
21
22
23
24
25
26
27
28
29
30
31
32
33
34
35
36
37
38
39
40
41
42
43
44
45
46
47
48
49
50
51
52
53
54
55
56
57
58
59
60
61
62
63
64
65
66
67
68
69
70
71
72
73
74
|
# 인스턴스 스토어 볼륨이 있는 c5 모든 타입의 스토리지 크기
aws ec2 describe-instance-types \
--filters "Name=instance-type,Values=c5*" "Name=instance-storage-supported,Values=true" \
--query "InstanceTypes[].[InstanceType, InstanceStorageInfo.TotalSizeInGB]" \
--output table
--------------------------
| DescribeInstanceTypes |
+---------------+--------+
| c5d.large | 50 |
| c5d.12xlarge | 1800 |
...
# 신규 노드 그룹 생성
eksctl create nodegroup --help
eksctl create nodegroup -c $CLUSTER_NAME -r $AWS_DEFAULT_REGION --subnet-ids "$PubSubnet1","$PubSubnet2","$PubSubnet3" --ssh-access \
-n ng2 -t c5d.large -N 1 -m 1 -M 1 --node-volume-size=30 --node-labels disk=nvme --max-pods-per-node 100 --dry-run > myng2.yaml
cat <<EOT > nvme.yaml
preBootstrapCommands:
- |
# Install Tools
yum install nvme-cli links tree jq tcpdump sysstat -y
# Filesystem & Mount
mkfs -t xfs /dev/nvme1n1
mkdir /data
mount /dev/nvme1n1 /data
# Get disk UUID
uuid=\$(blkid -o value -s UUID mount /dev/nvme1n1 /data)
# Mount the disk during a reboot
echo /dev/nvme1n1 /data xfs defaults,noatime 0 2 >> /etc/fstab
EOT
sed -i -n -e '/volumeType/r nvme.yaml' -e '1,$p' myng2.yaml
eksctl create nodegroup -f myng2.yaml
# 노드 보안그룹 ID 확인
NG2SGID=$(aws ec2 describe-security-groups --filters Name=group-name,Values=*ng2* --query "SecurityGroups[*].[GroupId]" --output text)
aws ec2 authorize-security-group-ingress --group-id $NG2SGID --protocol '-1' --cidr 192.168.1.100/32
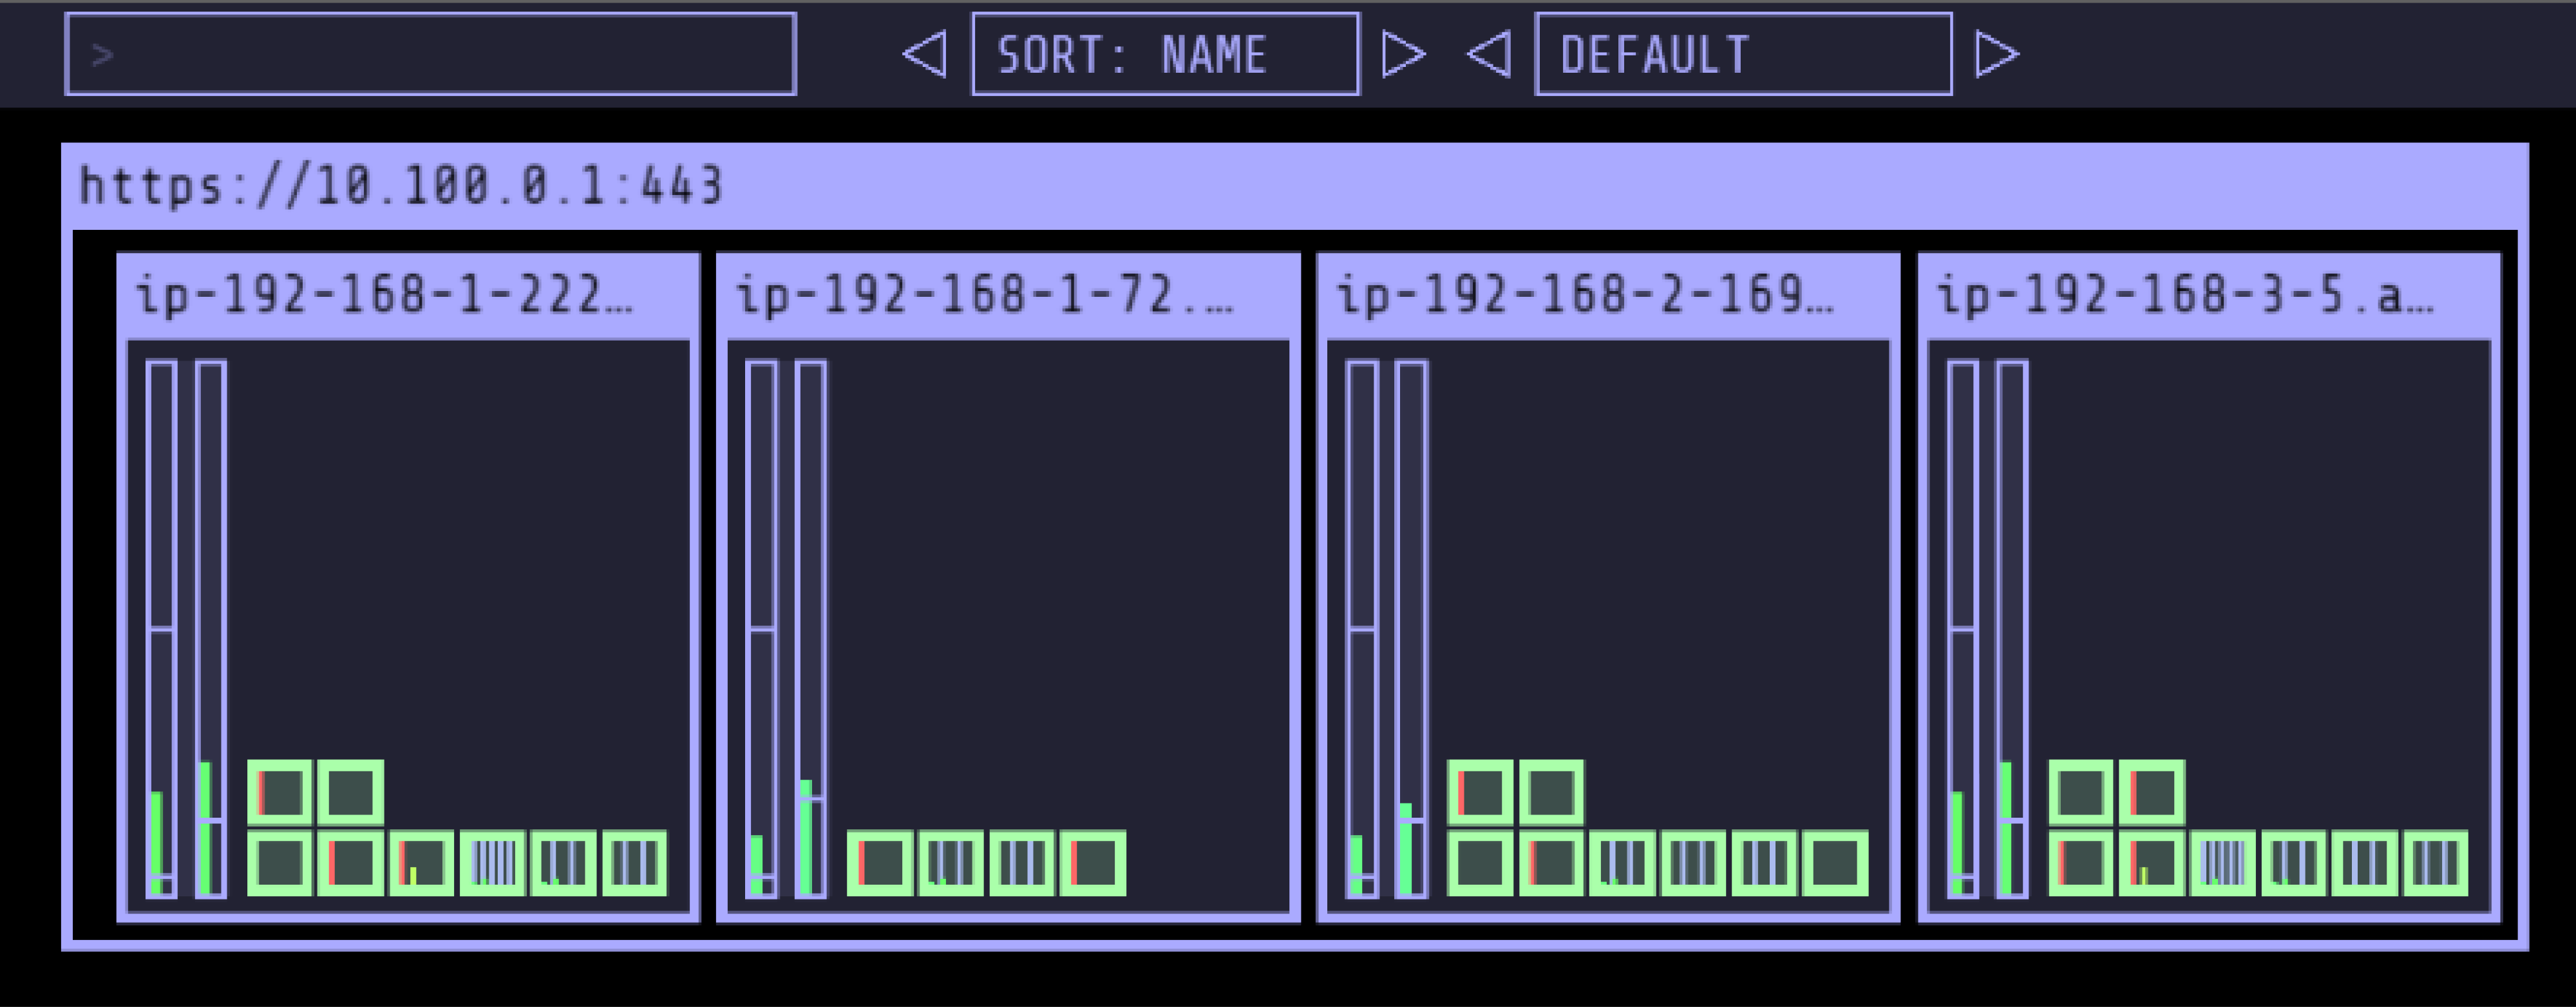
# 노드 IP확인
kubectl get no -owide
NAME STATUS ROLES AGE VERSION INTERNAL-IP EXTERNAL-IP OS-IMAGE KERNEL-VERSION CONTAINER-RUNTIME
ip-192-168-1-222.ap-northeast-2.compute.internal Ready <none> 5h46m v1.24.11-eks-a59e1f0 192.168.1.222 43.201.85.26 Amazon Linux 2 5.10.178-162.673.amzn2.x86_64 containerd://1.6.19
ip-192-168-1-72.ap-northeast-2.compute.internal Ready <none> 8m1s v1.24.11-eks-a59e1f0 192.168.1.72 13.124.87.210 Amazon Linux 2 5.10.178-162.673.amzn2.x86_64 containerd://1.6.19
ip-192-168-2-169.ap-northeast-2.compute.internal Ready <none> 5h46m v1.24.11-eks-a59e1f0 192.168.2.169 3.38.173.116 Amazon Linux 2 5.10.178-162.673.amzn2.x86_64 containerd://1.6.19
ip-192-168-3-5.ap-northeast-2.compute.internal Ready <none> 5h46m v1.24.11-eks-a59e1f0 192.168.3.5 3.34.46.195 Amazon Linux 2 5.10.178-162.673.amzn2.x86_64 containerd://1.6.19
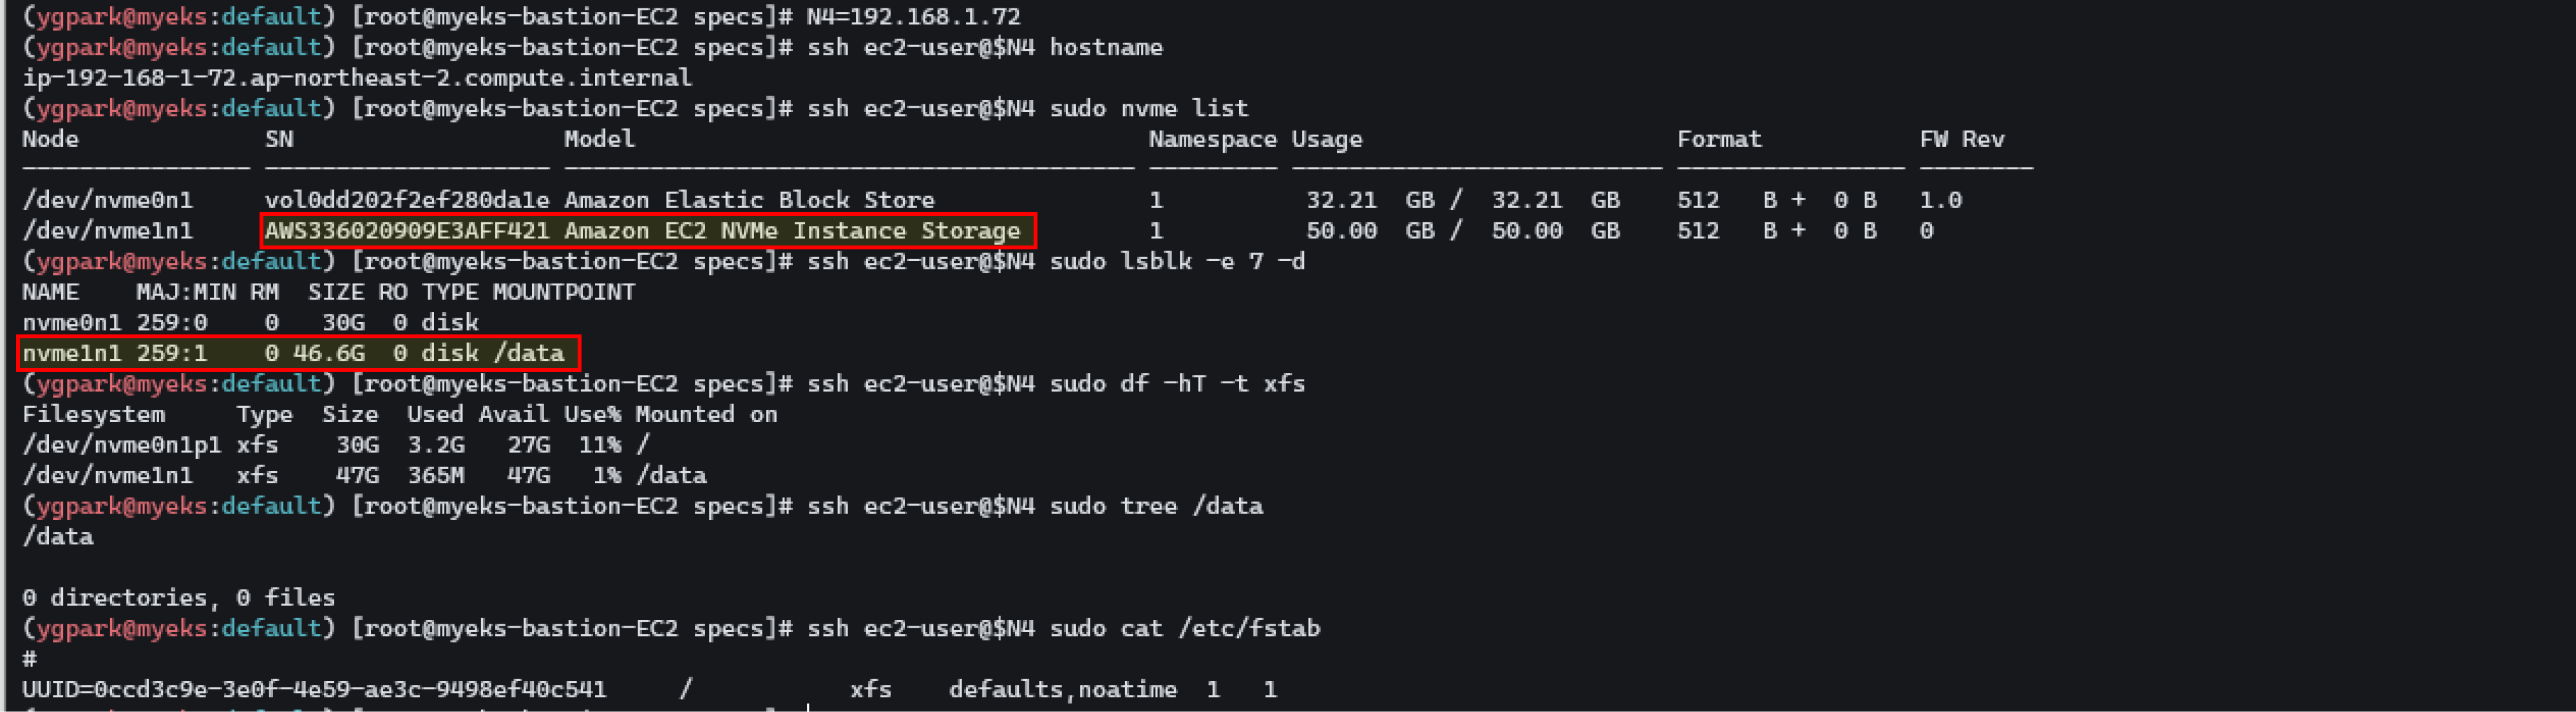
# 워커 노드 SSH 접속
N4=192.168.1.72
ssh ec2-user@$N4 hostname
# 확인
ssh ec2-user@$N4 sudo nvme list
ssh ec2-user@$N4 sudo lsblk -e 7 -d
ssh ec2-user@$N4 sudo df -hT -t xfs
ssh ec2-user@$N4 sudo tree /data
ssh ec2-user@$N4 sudo cat /etc/fstab
# (옵션) max-pod 확인
kubectl describe node -l disk=nvme | grep Allocatable: -A7
Allocatable:
attachable-volumes-aws-ebs: 25
cpu: 1930m
ephemeral-storage: 27905944324
hugepages-1Gi: 0
hugepages-2Mi: 0
memory: 3097552Ki
pods: 100
# (옵션) kubelet 데몬 파라미터 확인 : --max-pods=29 --max-pods=100
ssh ec2-user@$N4 sudo ps -ef | grep kubelet
root 2972 1 0 16:03 ? 00:00:09 /usr/bin/kubelet --config /etc/kubernetes/kubelet/kubelet-config.json --kubeconfig /var/lib/kubelet/kubeconfig --container-runtime-endpoint unix:///run/containerd/containerd.sock --image-credential-provider-config /etc/eks/image-credential-provider/config.json --image-credential-provider-bin-dir /etc/eks/image-credential-provider --node-ip=192.168.3.131 --pod-infra-container-image=602401143452.dkr.ecr.ap-northeast-2.amazonaws.com/eks/pause:3.5 --v=2 --cloud-provider=aws --container-runtime=remote --node-labels=eks.amazonaws.com/sourceLaunchTemplateVersion=1,alpha.eksctl.io/cluster-name=myeks,alpha.eksctl.io/nodegroup-name=ng2,disk=nvme,eks.amazonaws.com/nodegroup-image=ami-0da378ed846e950a4,eks.amazonaws.com/capacityType=ON_DEMAND,eks.amazonaws.com/nodegroup=ng2,eks.amazonaws.com/sourceLaunchTemplateId=lt-030e6043923ce712b --max-pods=29 --max-pods=100
|
cs |

2. 인스턴스 스토어로 변경 - 스토리지 클래스 재생성
기존에 있던 local-path storageClass를 삭제하고 Amazon EC2 인스턴스 스토어를 사용하도록 스토리지 클래스를 재생성 한다. IOPS 측정은 3 성능 측정 확인은 스토리지 클래스 재생성 전에 측정 후 인스턴스 스토어를 측정한다. 측정 전에 kubestr 설치가 필요하다.
|
1
2
3
4
5
6
7
8
9
10
11
12
13
14
15
16
17
18
|
# 기존 삭제
#curl -s -O https://raw.githubusercontent.com/rancher/local-path-provisioner/master/deploy/local-path-storage.yaml
kubectl delete -f local-path-storage.yaml
#
sed -i 's/opt/data/g' local-path-storage.yaml
kubectl apply -f local-path-storage.yaml
# 모니터링
watch 'kubectl get pod -n local-path-storage -owide;echo;kubectl get pv,pvc -n local-path-storage'
ssh ec2-user@$N4 iostat -xmdz 1 -p nvme1n1
Device: rrqm/s wrqm/s r/s w/s rMB/s wMB/s avgrq-sz avgqu-sz await r_await w_await svctm %util
nvme1n1 0.00 0.00 0.10 0.09 0.00 0.01 123.87 0.0 0.19 0.06 0.33 0.30 0.01
# 측정 : Read
#curl -s -O https://raw.githubusercontent.com/wikibook/kubepractice/main/ch10/fio-read.fio
kubestr fio -f fio-read.fio -s local-path --size 10G --nodeselector disk=nvme
...
|
cs |
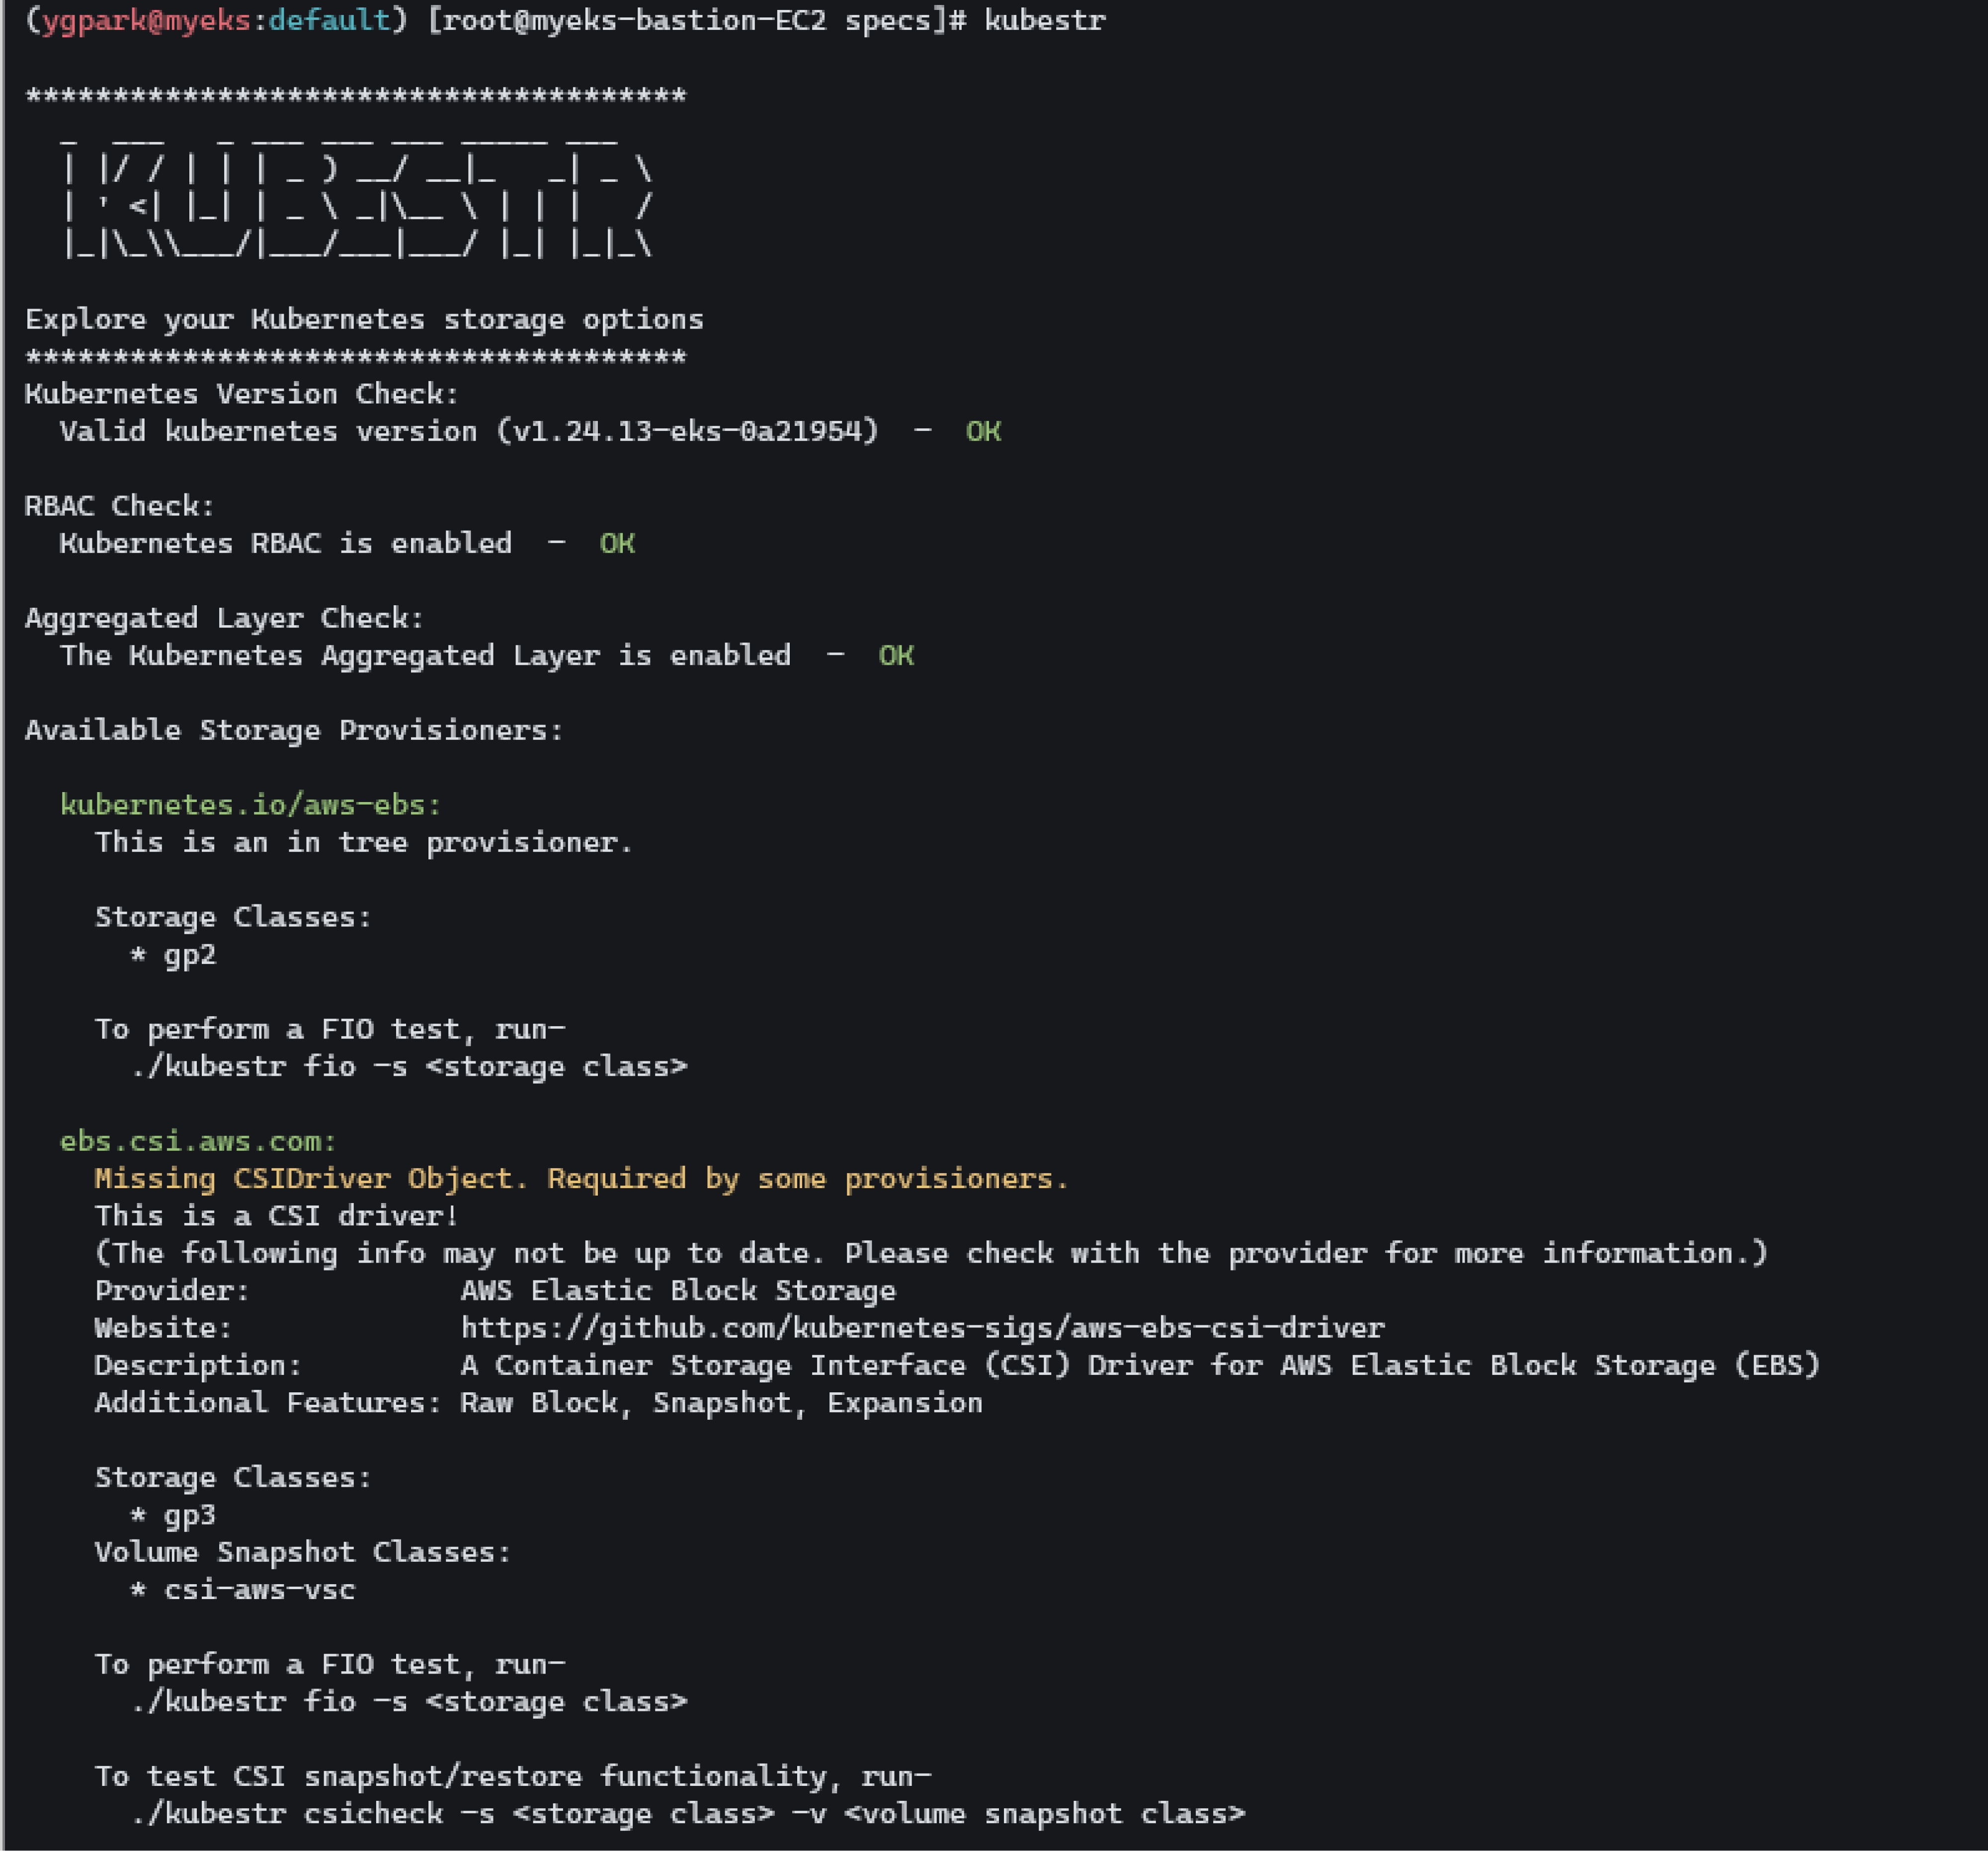
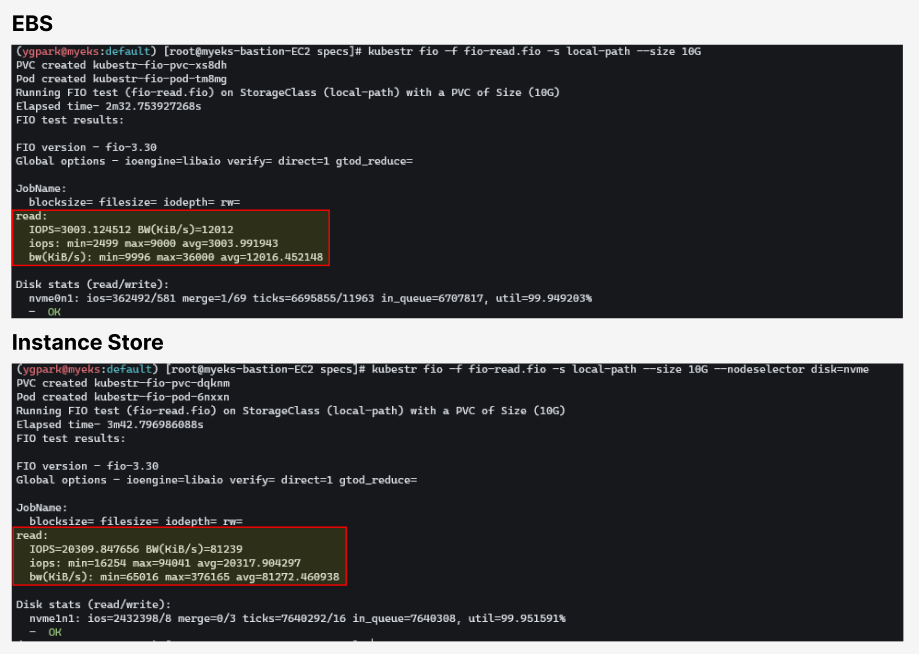
3. Kubestr & sar 모니터링 및 성능 측정 확인 (NVMe SSD)
local-path와 NFS 등 스토리지 클래스의 IOPS 차이를 확인할 수 있다. 이 테스트에서는 Read를 측정하여 비교했다.

|
1
2
3
4
5
6
7
8
9
10
11
12
13
14
15
16
17
18
19
20
21
22
23
24
25
26
27
28
29
30
31
32
33
34
35
36
37
38
39
40
41
42
43
44
45
46
47
48
49
|
# kubestr 툴 다운로드
wget https://github.com/kastenhq/kubestr/releases/download/v0.4.37/kubestr_0.4.37_Linux_amd64.tar.gz
tar xvfz kubestr_0.4.37_Linux_amd64.tar.gz && mv kubestr /usr/local/bin/ && chmod +x /usr/local/bin/kubestr
LICENSE
README.md
kubestr
# 스토리지클래스 점검
kubestr -h
kubestr
# 모니터링
watch 'kubectl get pod -owide;echo;kubectl get pv,pvc'
ssh ec2-user@$N1 iostat -xmdz 1 -p nvme0n1
Device: rrqm/s wrqm/s r/s w/s rMB/s wMB/s avgrq-sz avgqu-sz await r_await w_await svctm %util
nvme0n1 0.00 1.00 0.00 6.00 0.00 0.05 17.50 0.01 0.67 0.00 0.67 1.33 0.80
nvme0n1p1 0.00 1.00 0.00 6.00 0.00 0.05 17.50 0.00 0.67 0.00 0.67 1.33 0.80
ssh ec2-user@$N2 iostat -xmdz 1 -p nvme0n1
Device: rrqm/s wrqm/s r/s w/s rMB/s wMB/s avgrq-sz avgqu-sz await r_await w_await svctm %util
nvme0n1 0.00 1.00 0.00 5.00 0.00 0.03 14.00 0.00 0.80 0.00 0.80 0.80 0.40
nvme0n1p1 0.00 1.00 0.00 5.00 0.00 0.03 14.00 0.00 0.80 0.00 0.80 0.80 0.40
ssh ec2-user@$N3 iostat -xmdz 1 -p nvme0n1
--------------------------------------------------------------
# rrqm/s : 초당 드라이버 요청 대기열에 들어가 병합된 읽기 요청 횟수
# wrqm/s : 초당 드라이버 요청 대기열에 들어가 병합된 쓰기 요청 횟수
# r/s : 초당 디스크 장치에 요청한 읽기 요청 횟수
# w/s : 초당 디스크 장치에 요청한 쓰기 요청 횟수
# rMB/s : 초당 디스크 장치에서 읽은 메가바이트 수
# wMB/s : 초당 디스크 장치에 쓴 메가바이트 수
# await : 가장 중요한 지표, 평균 응답 시간. 드라이버 요청 대기열에서 기다린 시간과 장치의 I/O 응답시간을 모두 포함 (단위: ms)
iostat -xmdz 1 -p xvdf
Device: rrqm/s wrqm/s r/s w/s rMB/s wMB/s avgrq-sz avgqu-sz await r_await w_await svctm %util
xvdf 0.00 0.00 2637.93 0.00 10.30 0.00 8.00 6.01 2.28 2.28 0.00 0.33 86.21
--------------------------------------------------------------
# 측정 : Read
curl -s -O https://raw.githubusercontent.com/wikibook/kubepractice/main/ch10/fio-read.fio
kubestr fio -f fio-read.fio -s local-path --size 10G
# [NVMe] 4k 디스크 블록 기준 Read 평균 IOPS는 20309 >> 4분 정도 소요
# 측정 : Write
curl -s -O https://raw.githubusercontent.com/wikibook/kubepractice/main/ch10/fio-write.fio
sed -i '/directory/d' fio-write.fio
kubestr fio -f fio-write.fio -s local-path --size 10G
# [NVMe] 4k 디스크 블록 기준 Write 평균 IOPS는 9082 >> 9분 정도 소요
|
cs |
인스턴스 스토어가 EBS보다 7배의 평균 IOPS 읽기 속도를 보인다.
'스터디 > Kubernetes' 카테고리의 다른 글
| [AWES] EKS - Autoscaling (0) | 2023.05.27 |
|---|---|
| [AWES] EKS Observability (0) | 2023.05.21 |
| [AWES] EKS Storage 4/5 - AWS EFS Controller (1) | 2023.05.14 |
| [AWES] EKS Storage 3/5 - AWS Volume SnapShots Controller (1) | 2023.05.14 |
| [AWES] EKS Storage 2/5 - AWS EBS Controller (1) | 2023.05.14 |