

AEWS 스터디에서는 AWS의 관리형 Kubernetes인 Elastic Kubernetes의 다양한 기능들을 실습해보면서 익혀본다. 이 글은 스터디를 참여하면서 학습한 내용을 정리하는 연재 글이다. 스터디 진도에 맞춰 글을 작성한다.
이 글에서는 EKS Automation - flux에 대해서 알아본다.
1. flux?
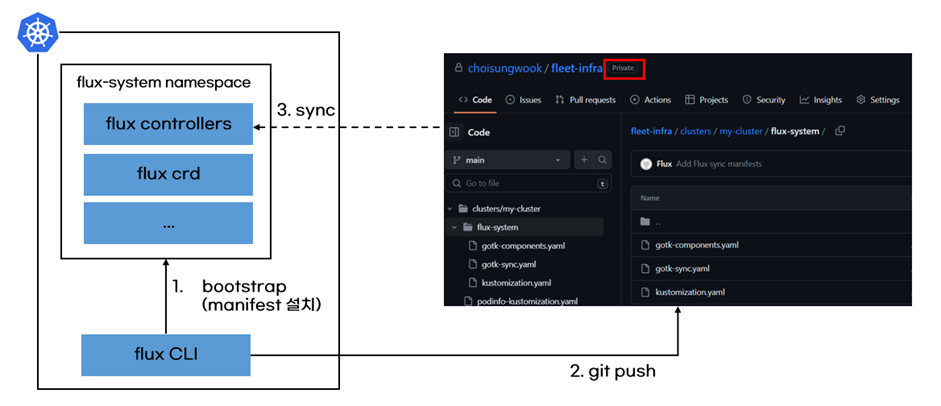
flux는 쿠버네티스를 위한 gitops 도구로, git에 있는 쿠버네티스를 manifest를 읽고, 쿠버네티스에 manifest를 배포한다.
악분일상님이 argocd 비교하여 개념과 예제를 정말 잘 정리해준 글이 있다. 자세한 내용은 아래 글을 참고 바란다.

flux설치는 flux CLI bootstrap명령어로 쿠버네티스 리소스를 생성한다. 설치된 리소스는 git에 push가 필요, git주소와 git인증정보가 필요하다. GITHUB_USER, GITHUB_TOKEN을 환경변수 설정 후에 설치 진행한다. 최초 설치 이후 flux는 자기 자신을 gitops로 설정을 동기화한다.
2. Flux CLI 설치 및 Bootstrap
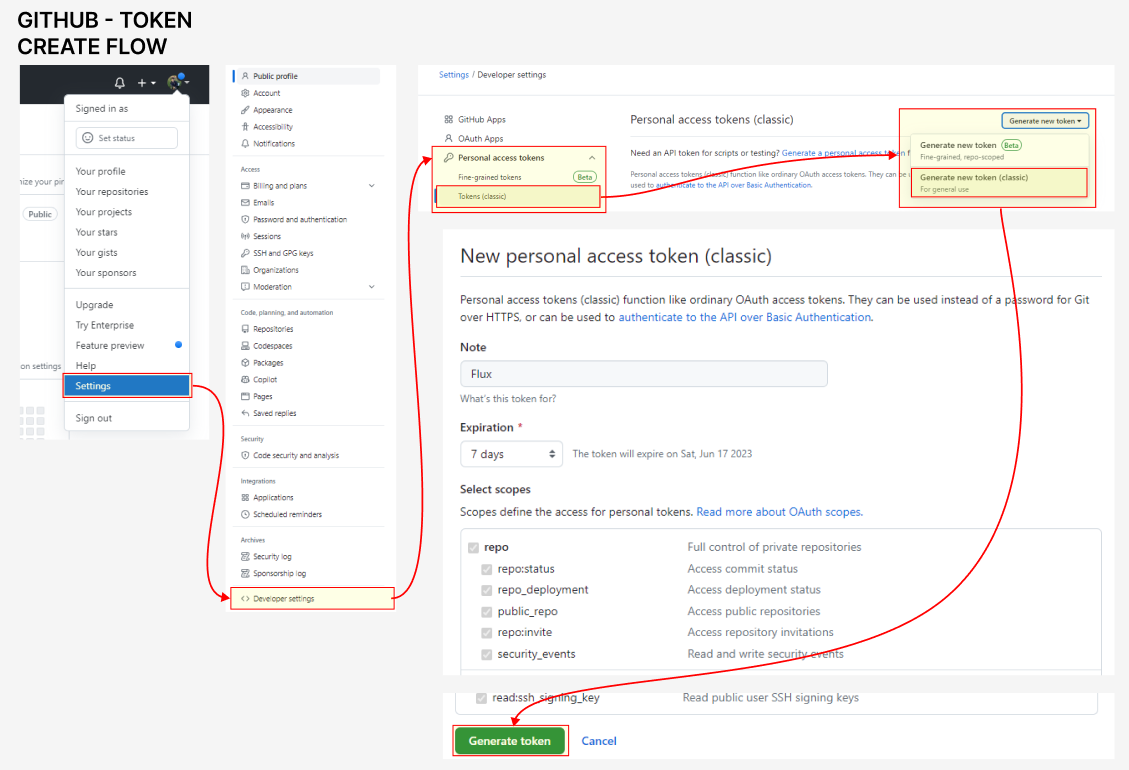
GITHUB_TOKEN 토큰 발급
Flux CLI 설치 및 Bootstrap
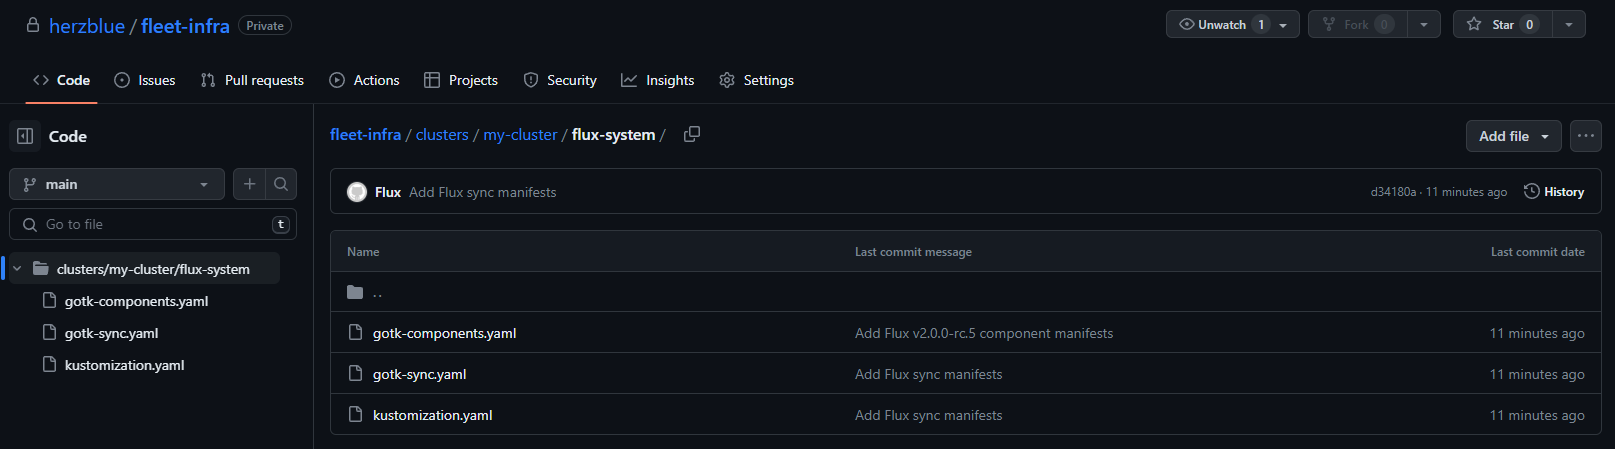
Github에 접속해보면 private 저장소가 생성된 것을 확인 할 수 있다. 디렉토리 경로 안에 yaml 파일이 들어가 있다.
|
1
2
3
4
5
6
7
8
9
10
11
12
13
14
15
16
17
18
19
20
21
22
23
24
25
26
27
28
29
30
31
32
33
|
# Flux CLI 설치
curl -s https://fluxcd.io/install.sh | sudo bash
. <(flux completion bash)
# 버전 확인
flux --version
flux version 2.0.0-rc.5
# 자신의 Github 토큰과 유저이름 변수 지정
export GITHUB_TOKEN=<your-token>
export GITHUB_USER=<your-username>
export GITHUB_TOKEN=ghp_###
export GITHUB_USER=herzblue
# Bootstrap
## Creates a git repository fleet-infra on your GitHub account.
## Adds Flux component manifests to the repository.
## Deploys Flux Components to your Kubernetes Cluster.
## Configures Flux components to track the path /clusters/my-cluster/ in the repository.
flux bootstrap github \
--owner=$GITHUB_USER \
--repository=fleet-infra \
--branch=main \
--path=./clusters/my-cluster \
--personal
# 설치 확인
kubectl get pods -n flux-system
kubectl get-all -n flux-system
kubectl get crd | grep fluxc
kubectl get gitrepository -n flux-system
NAME URL AGE READY STATUS
flux-system ssh://git@github.com/herzblue/fleet-infra 5m21s True stored artifact for revision 'main@sha1:d341xxx'
|
cs |
3. gitops 도구 설치 (flux 대시보드 사용)
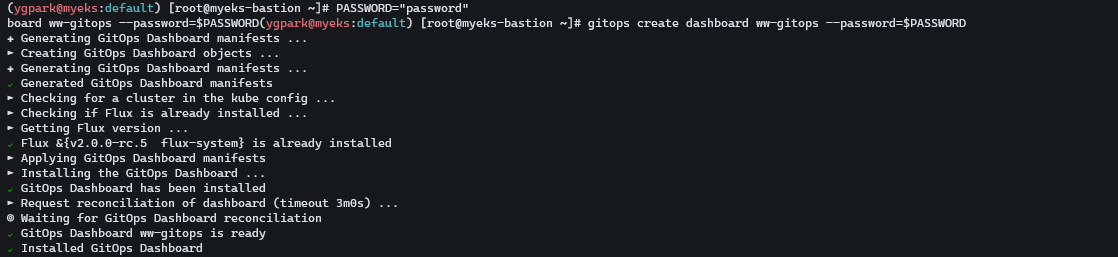
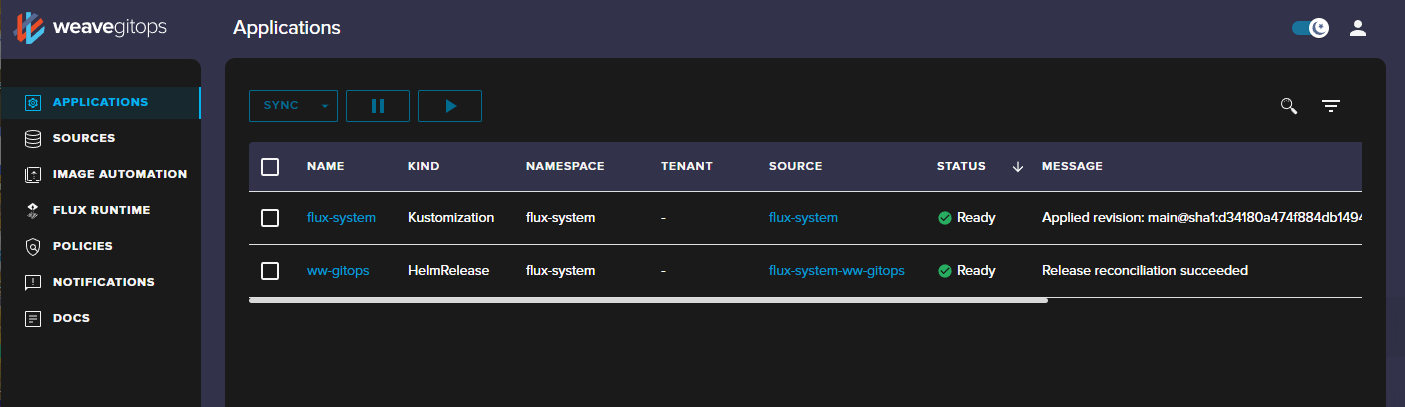
도구를 설치하고, 대시보드를 설치한다. flux 명령어를 사용해서 gitops 정보를 확인 할 수 있다. ingress 설정한 후에 접속해본다. 대시보드에 들어갈 때 id,pw 정보를 각각 admin, password 로 설정했다.
- gitops 도구 설치
|
1
2
3
4
5
6
7
8
9
10
11
12
|
# gitops 도구 설치
curl --silent --location "https://github.com/weaveworks/weave-gitops/releases/download/v0.24.0/gitops-$(uname)-$(uname -m).tar.gz" | tar xz -C /tmp
sudo mv /tmp/gitops /usr/local/bin
gitops version
# flux 대시보드 설치
PASSWORD="password"
gitops create dashboard ww-gitops --password=$PASSWORD
# 확인
flux -n flux-system get helmrelease
kubectl -n flux-system get pod,svc
|
cs |
- Ingress 설정
|
1
2
3
4
5
6
7
8
9
10
11
12
13
14
15
16
17
18
19
20
21
22
23
24
25
26
27
28
29
30
31
32
33
34
35
36
37
38
39
|
# Ingress 설정
CERT_ARN=`aws acm list-certificates --query 'CertificateSummaryList[].CertificateArn[]' --output text`
echo $CERT_ARN
cat <<EOT > gitops-ingress.yaml
apiVersion: networking.k8s.io/v1
kind: Ingress
metadata:
name: gitops-ingress
annotations:
alb.ingress.kubernetes.io/certificate-arn: $CERT_ARN
alb.ingress.kubernetes.io/group.name: study
alb.ingress.kubernetes.io/listen-ports: '[{"HTTPS":443}, {"HTTP":80}]'
alb.ingress.kubernetes.io/load-balancer-name: myeks-ingress-alb
alb.ingress.kubernetes.io/scheme: internet-facing
alb.ingress.kubernetes.io/ssl-redirect: "443"
alb.ingress.kubernetes.io/success-codes: 200-399
alb.ingress.kubernetes.io/target-type: ip
spec:
ingressClassName: alb
rules:
- host: gitops.$MyDomain
http:
paths:
- backend:
service:
name: ww-gitops-weave-gitops
port:
number: 9001
path: /
pathType: Prefix
EOT
kubectl apply -f gitops-ingress.yaml -n flux-system
# 배포 확인
kubectl get ingress -n flux-system
# GitOps 접속 정보 확인 >> 웹 접속 후 정보 확인
echo -e "GitOps Web https://gitops.$MyDomain"
|
cs |
4. 애플리케이션 실습
github에 있는 nginx manifest를 쿠버네티스에 배포 (kusotmize를 사용)
예제 파드는 악분님이 구성해주신 nginx를 사용한다. flux가 위 소스를 원천 소스로 사용한다.
hello world (kubstomize) - Github(악분님)
git 소스 생성, 확인
|
1
2
3
4
5
6
7
8
9
|
# 소스 생성 : 유형 - git, helm, oci, bucket
# flux create source {소스 유형}
# 악분(최성욱)님이 준비한 repo로 git 소스 생성
GITURL="https://github.com/sungwook-practice/fluxcd-test.git"
flux create source git nginx-example1 --url=$GITURL --branch=main --interval=30s
# 소스 확인
flux get sources git
kubectl -n flux-system get gitrepositories
|
cs |
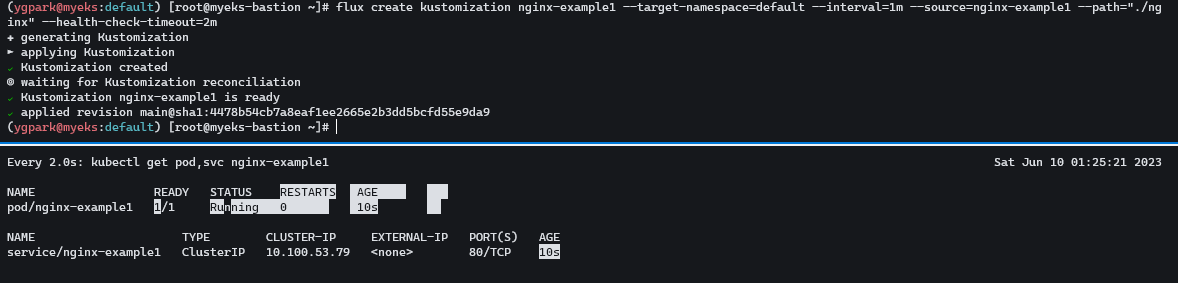
flux 애플리케이션 생성
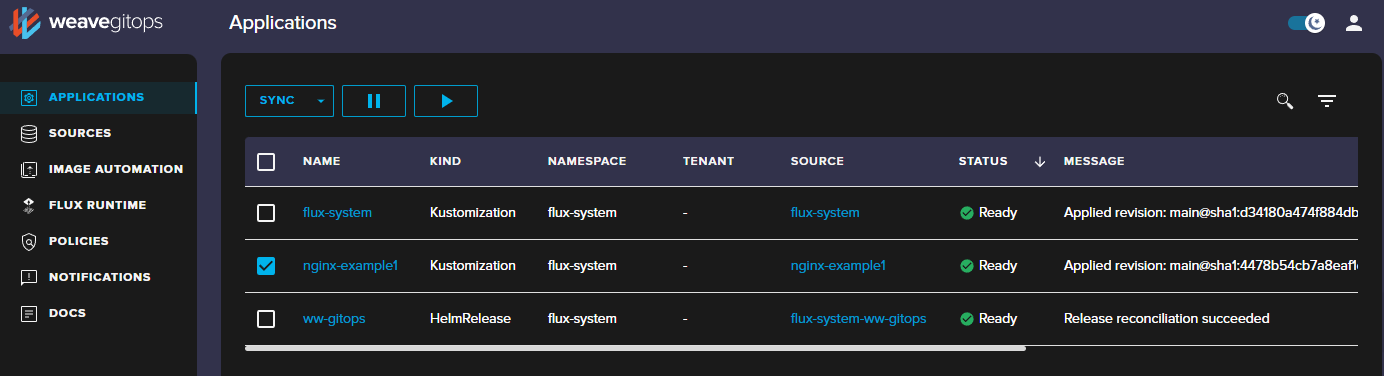
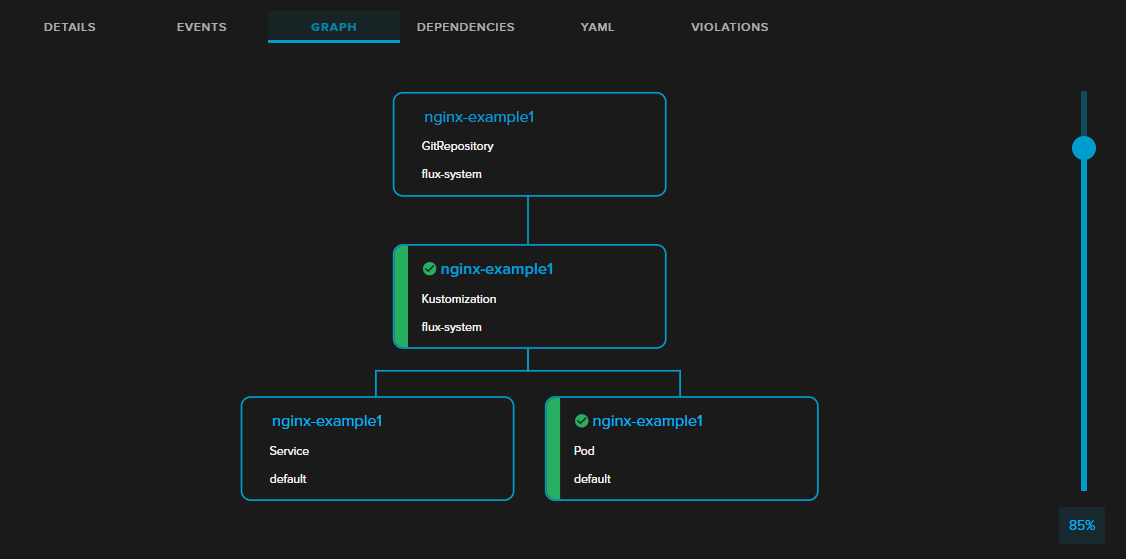
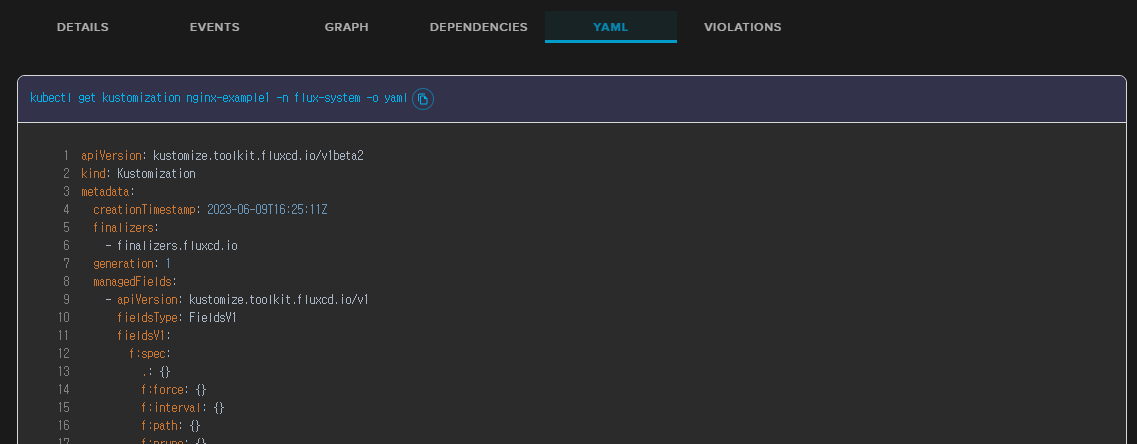
유형은 kustomization 으로, 깃 소스 경로는( --path ./nginx) 설정하여 어플리케이션 배포를 한다. gitops 웹 대시보드에서 확인할 수 있다.
|
1
2
3
4
5
6
7
8
9
10
|
# [터미널] 모니터링
watch -d kubectl get pod,svc nginx-example1
# flux 애플리케이션 생성 : nginx-example1
flux create kustomization nginx-example1 --target-namespace=default --interval=1m --source=nginx-example1 --path="./nginx" --health-check-timeout=2m
# 확인
kubectl get pod,svc nginx-example1
kubectl get kustomizations -n flux-system
flux get kustomizations
|
cs |
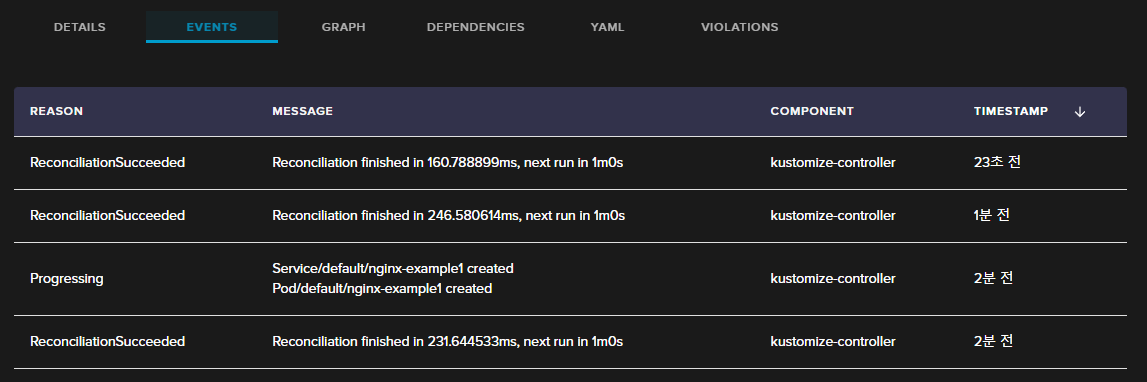
대시보드에서 어플리케이션의 다양한 정보를 확인 할 수 있다.

flux 애플리케이션 삭제
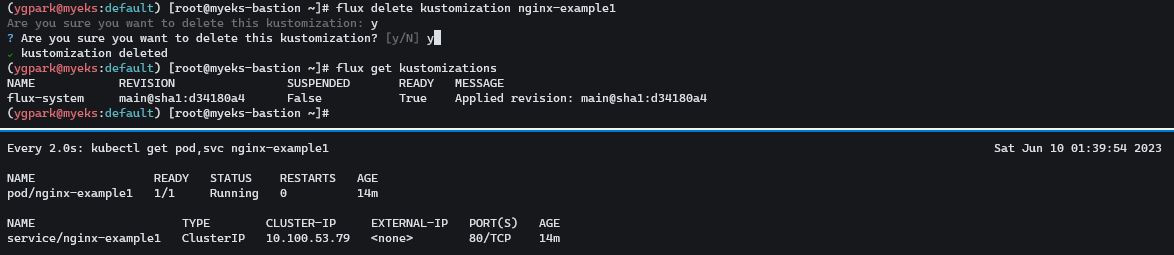
애플리케이션 생성시 prune옵션을 false(default)로 하면 flux 애플리케이션을 삭제해도 pod와 service가 삭제되지 않는다.
|
1
2
3
4
5
6
7
8
9
10
11
12
13
14
15
16
17
18
19
20
21
22
23
24
25
26
27
28
29
30
31
32
|
# [터미널] 모니터링
watch -d kubectl get pod,svc nginx-example1
# flux 애플리케이션 삭제 >> 파드와 서비스는? flux 애플리케이션 생성 시 --prune 옵션 false(default 값)
flux delete kustomization nginx-example1
flux get kustomizations
kubectl get pod,svc nginx-example1
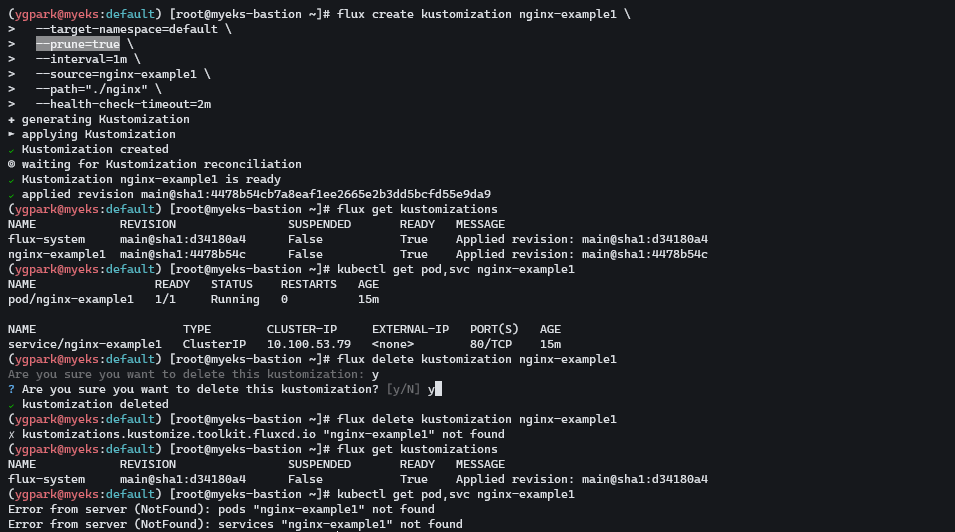
# flux 애플리케이션 다시 생성 : --prune 옵션 true
flux create kustomization nginx-example1 \
--target-namespace=default \
--prune=true \
--interval=1m \
--source=nginx-example1 \
--path="./nginx" \
--health-check-timeout=2m
# 확인
flux get kustomizations
kubectl get pod,svc nginx-example1
# flux 애플리케이션 삭제 >> 파드와 서비스는?
flux delete kustomization nginx-example1
flux get kustomizations
kubectl get pod,svc nginx-example1
# flux 소스 삭제
flux delete source git nginx-example1
# 소스 확인
flux get sources git
kubectl -n flux-system get gitrepositories
|
cs |
5. 애플리케이션 실습 2 (deployment 개수 변경)
Flux 공식 Docs 샘플 실습으로 yaml에서 deployment 개수를 변경하는 실습을 진행합니다.
(Flux 공식 Docs 샘플 실습 - 링크)
Clone the git repository
|
1
2
3
4
5
6
7
8
|
# Clone the git repository : 자신의 Github 의 Username, Token 입력
git clone https://github.com/$GITHUB_USER/fleet-infra
Username for 'https://github.com': <자신의 Github 의 Username>
Password for 'https://herzblue@github.com': <자신의 Github의 Token>
# 폴더 이동
cd fleet-infra
tree
|
cs |

Add podinfo repository to Flux - 샘플
|
1
2
3
4
5
6
7
8
9
10
11
12
13
14
15
16
17
18
19
20
21
|
# GitRepository yaml 파일 생성
flux create source git podinfo \
--url=https://github.com/stefanprodan/podinfo \
--branch=master \
--interval=30s \
--export > ./clusters/my-cluster/podinfo-source.yaml
# GitRepository yaml 파일 확인
cat ./clusters/my-cluster/podinfo-source.yaml | yh
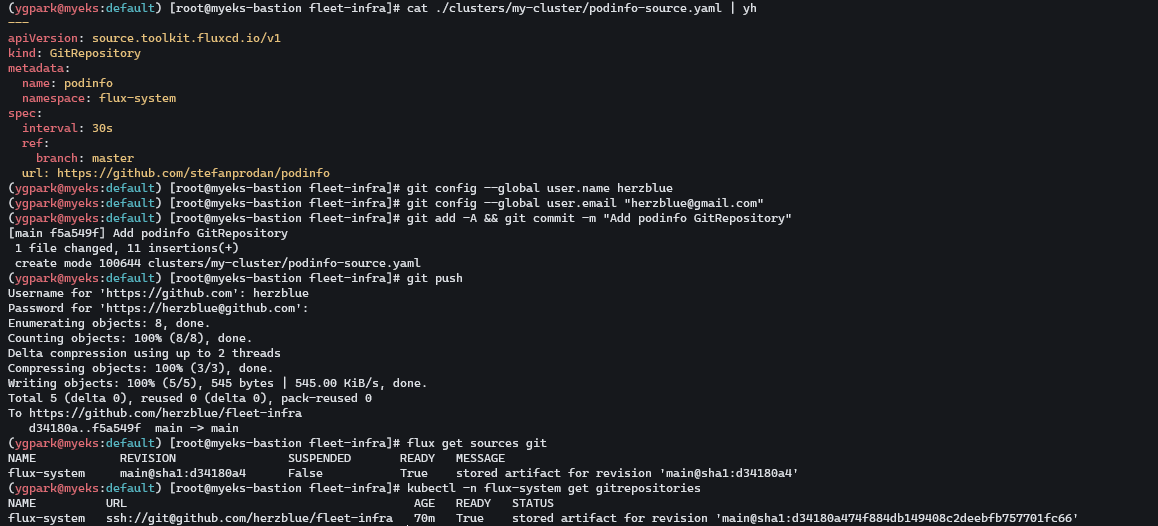
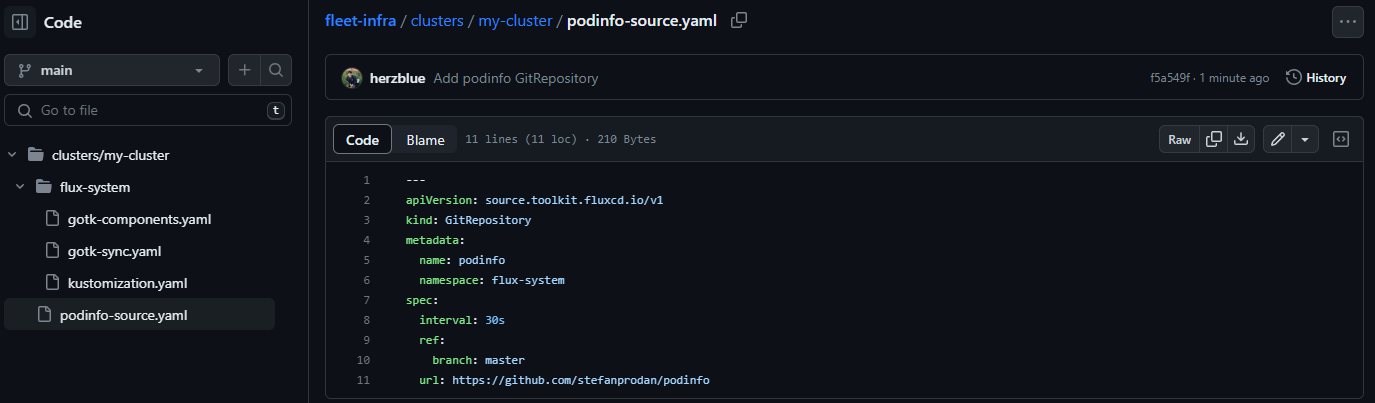
# Commit and push the podinfo-source.yaml file to the fleet-infra repository >> Github 확인
git config --global user.name "Your Name"
git config --global user.email "you@example.com"
git add -A && git commit -m "Add podinfo GitRepository"
git push
Username for 'https://github.com': <자신의 Github 의 Username>
Password for 'https://gasida@github.com': <자신의 Github의 Token>
# 소스 확인
flux get sources git
kubectl -n flux-system get gitrepositories
|
cs |
Deploy podinfo application
podinfo 리포지토리에 있는 kustomize 디렉터리를 빌드하고 적용하도록 Flux를 구성 - 링크
|
1
2
3
4
5
6
7
8
9
10
11
12
13
14
15
16
17
18
19
20
21
22
23
24
|
# [터미널]
watch -d kubectl get pod,svc
# Use the flux create command to create a Kustomization that applies the podinfo deployment.
flux create kustomization podinfo \
--target-namespace=default \
--source=podinfo \
--path="./kustomize" \
--prune=true \
--interval=5m \
--export > ./clusters/my-cluster/podinfo-kustomization.yaml
# 파일 확인
cat ./clusters/my-cluster/podinfo-kustomization.yaml | yh
# Commit and push the Kustomization manifest to the repository:
git add -A && git commit -m "Add podinfo Kustomization"
git push
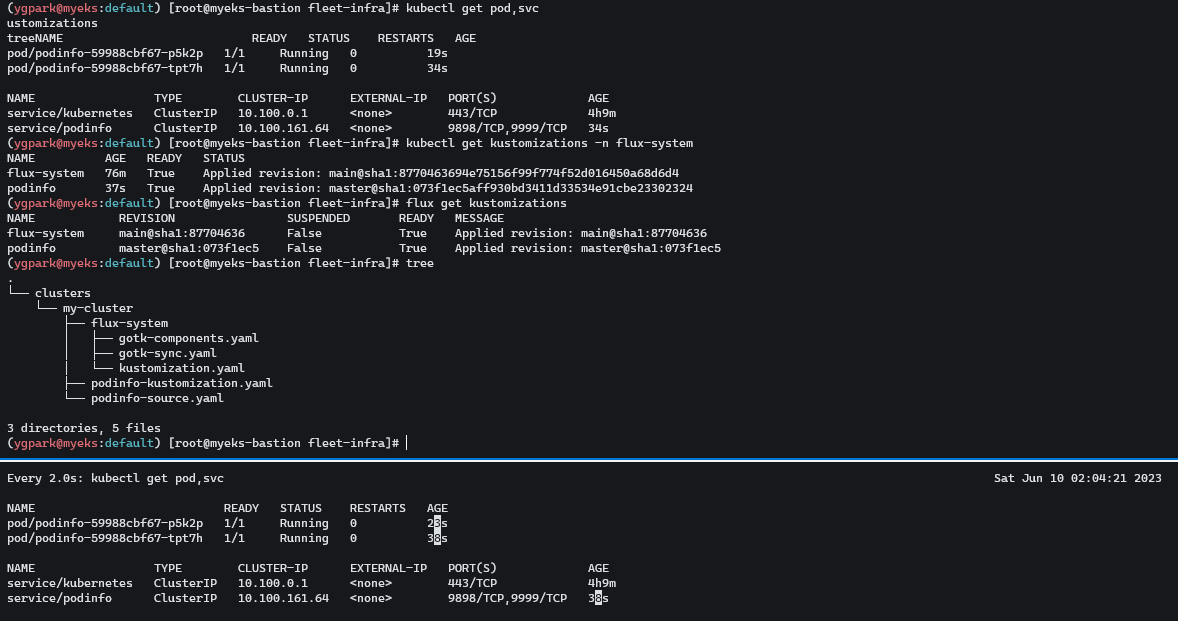
# 확인
kubectl get pod,svc
kubectl get kustomizations -n flux-system
flux get kustomizations
tree
|
cs |
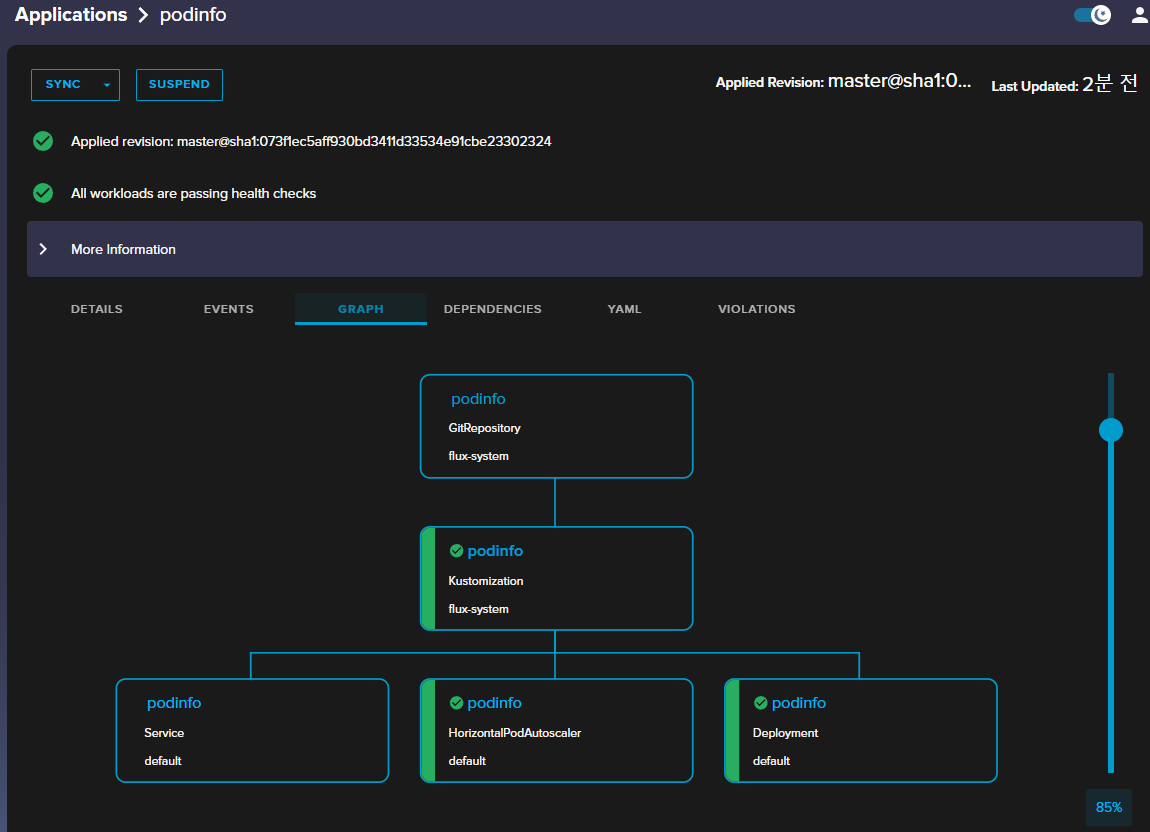
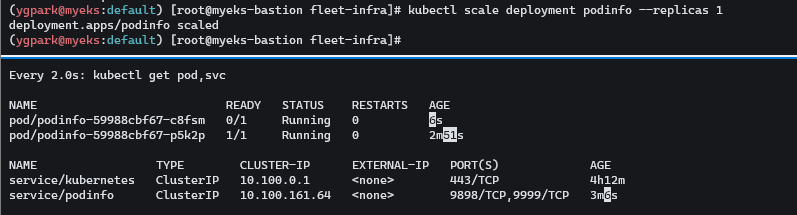
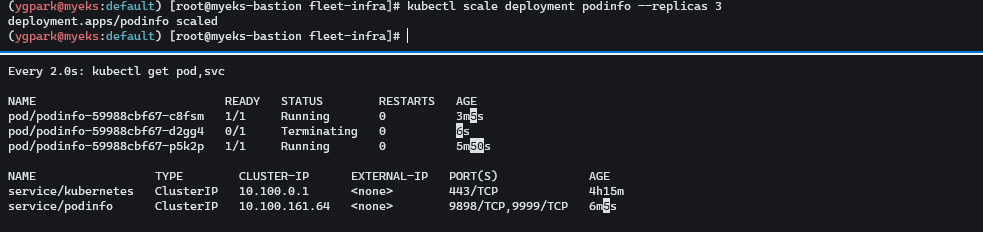
Watch Flux sync the application
파드 갯수 변경 시도 하면 얼마 안가서 git 저장소에 설정된 replicas 2개로 돌아온다.
|
1
2
3
4
5
6
7
8
|
# [터미널]
watch -d kubectl get pod,svc
# 파드 갯수 변경 시도 >> 어떻게 되는가?
kubectl scale deployment podinfo --replicas 1
...
kubectl scale deployment podinfo --replicas 3
...
|
cs |
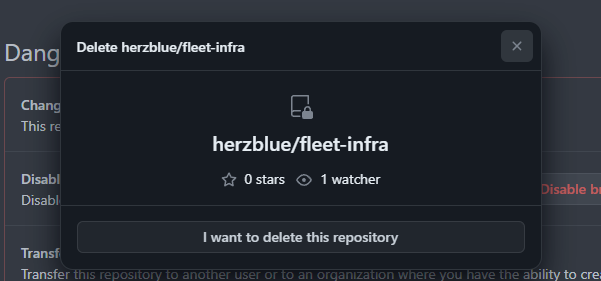
삭제 & Github에 fleet-infra Repo 제거
|
1
2
3
4
5
6
|
#
flux delete kustomization podinfo
flux delete source git podinfo
#
flux uninstall --namespace=flux-system
|
cs |
후기
EKS 스터디를 하면서 클라우드에서의 쿠버네티스 워크로드 운영 방법에 대해서 많이 배웠다. 더해서 복잡한 구조와 흐름들을 파악하고 실습하면서 쿠버네티스에 들어가 있는 다양한 개념들을 학습할 수 있었다. 가시다님의 스터디 내용은 이론부터 핸즈온 까지 완벽했다. 이런 빡빡하고 알찬 내용을 매번 준비 해주시는게 너무 감사한 마음이다. 스터디 중간의 팀원 발표에서는 새롭고 너무 유익한 내용을 알 수 있었다.
개인적으로는 복잡한 개념과 내용을 파악하는 연습을 할 수 있던 시간이었던 것 같다. 밤을 새워 내용을 공부하는 것이 힘들기도 했지만, 막바지에 이르니 좀 더 새로운 기술을 도전해보고 익히고 싶은 마음이 커졌다. 다음달까지는 요즘 관심이 가는 DW나 파이프라인 오케스트레이션 툴 같은 [데이터 인프라] 관해서 스터디 해보려고 한다.
'스터디 > Kubernetes' 카테고리의 다른 글
| [AWES] EKS Security - IRSA (0) | 2023.05.31 |
|---|---|
| [AWES] EKS Security - K8S 및 EKS의 인증/인가 (1) | 2023.05.30 |
| [AWES] EKS - Karpenter (0) | 2023.05.28 |
| [AWES] EKS - Autoscaling (0) | 2023.05.27 |
| [AWES] EKS Observability (0) | 2023.05.21 |
AEWS 스터디에서는 AWS의 관리형 Kubernetes인 Elastic Kubernetes의 다양한 기능들을 실습해보면서 익혀본다. 이 글은 스터디를 참여하면서 학습한 내용을 정리하는 연재 글이다. 스터디 진도에 맞춰 글을 작성한다.
이 글에서는 EKS Automation - flux에 대해서 알아본다.
1. flux?
flux는 쿠버네티스를 위한 gitops 도구로, git에 있는 쿠버네티스를 manifest를 읽고, 쿠버네티스에 manifest를 배포한다.
악분일상님이 argocd 비교하여 개념과 예제를 정말 잘 정리해준 글이 있다. 자세한 내용은 아래 글을 참고 바란다.
flux설치는 flux CLI bootstrap명령어로 쿠버네티스 리소스를 생성한다. 설치된 리소스는 git에 push가 필요, git주소와 git인증정보가 필요하다. GITHUB_USER, GITHUB_TOKEN을 환경변수 설정 후에 설치 진행한다. 최초 설치 이후 flux는 자기 자신을 gitops로 설정을 동기화한다.
2. Flux CLI 설치 및 Bootstrap
GITHUB_TOKEN 토큰 발급
Flux CLI 설치 및 Bootstrap
Github에 접속해보면 private 저장소가 생성된 것을 확인 할 수 있다. 디렉토리 경로 안에 yaml 파일이 들어가 있다.
|
1
2
3
4
5
6
7
8
9
10
11
12
13
14
15
16
17
18
19
20
21
22
23
24
25
26
27
28
29
30
31
32
33
|
# Flux CLI 설치
curl -s https://fluxcd.io/install.sh | sudo bash
. <(flux completion bash)
# 버전 확인
flux --version
flux version 2.0.0-rc.5
# 자신의 Github 토큰과 유저이름 변수 지정
export GITHUB_TOKEN=<your-token>
export GITHUB_USER=<your-username>
export GITHUB_TOKEN=ghp_###
export GITHUB_USER=herzblue
# Bootstrap
## Creates a git repository fleet-infra on your GitHub account.
## Adds Flux component manifests to the repository.
## Deploys Flux Components to your Kubernetes Cluster.
## Configures Flux components to track the path /clusters/my-cluster/ in the repository.
flux bootstrap github \
--owner=$GITHUB_USER \
--repository=fleet-infra \
--branch=main \
--path=./clusters/my-cluster \
--personal
# 설치 확인
kubectl get pods -n flux-system
kubectl get-all -n flux-system
kubectl get crd | grep fluxc
kubectl get gitrepository -n flux-system
NAME URL AGE READY STATUS
flux-system ssh://git@github.com/herzblue/fleet-infra 5m21s True stored artifact for revision 'main@sha1:d341xxx'
|
cs |
3. gitops 도구 설치 (flux 대시보드 사용)
도구를 설치하고, 대시보드를 설치한다. flux 명령어를 사용해서 gitops 정보를 확인 할 수 있다. ingress 설정한 후에 접속해본다. 대시보드에 들어갈 때 id,pw 정보를 각각 admin, password 로 설정했다.
- gitops 도구 설치
|
1
2
3
4
5
6
7
8
9
10
11
12
|
# gitops 도구 설치
curl --silent --location "https://github.com/weaveworks/weave-gitops/releases/download/v0.24.0/gitops-$(uname)-$(uname -m).tar.gz" | tar xz -C /tmp
sudo mv /tmp/gitops /usr/local/bin
gitops version
# flux 대시보드 설치
PASSWORD="password"
gitops create dashboard ww-gitops --password=$PASSWORD
# 확인
flux -n flux-system get helmrelease
kubectl -n flux-system get pod,svc
|
cs |
- Ingress 설정
|
1
2
3
4
5
6
7
8
9
10
11
12
13
14
15
16
17
18
19
20
21
22
23
24
25
26
27
28
29
30
31
32
33
34
35
36
37
38
39
|
# Ingress 설정
CERT_ARN=`aws acm list-certificates --query 'CertificateSummaryList[].CertificateArn[]' --output text`
echo $CERT_ARN
cat <<EOT > gitops-ingress.yaml
apiVersion: networking.k8s.io/v1
kind: Ingress
metadata:
name: gitops-ingress
annotations:
alb.ingress.kubernetes.io/certificate-arn: $CERT_ARN
alb.ingress.kubernetes.io/group.name: study
alb.ingress.kubernetes.io/listen-ports: '[{"HTTPS":443}, {"HTTP":80}]'
alb.ingress.kubernetes.io/load-balancer-name: myeks-ingress-alb
alb.ingress.kubernetes.io/scheme: internet-facing
alb.ingress.kubernetes.io/ssl-redirect: "443"
alb.ingress.kubernetes.io/success-codes: 200-399
alb.ingress.kubernetes.io/target-type: ip
spec:
ingressClassName: alb
rules:
- host: gitops.$MyDomain
http:
paths:
- backend:
service:
name: ww-gitops-weave-gitops
port:
number: 9001
path: /
pathType: Prefix
EOT
kubectl apply -f gitops-ingress.yaml -n flux-system
# 배포 확인
kubectl get ingress -n flux-system
# GitOps 접속 정보 확인 >> 웹 접속 후 정보 확인
echo -e "GitOps Web https://gitops.$MyDomain"
|
cs |
4. 애플리케이션 실습
github에 있는 nginx manifest를 쿠버네티스에 배포 (kusotmize를 사용)
예제 파드는 악분님이 구성해주신 nginx를 사용한다. flux가 위 소스를 원천 소스로 사용한다.
hello world (kubstomize) - Github(악분님)
git 소스 생성, 확인
|
1
2
3
4
5
6
7
8
9
|
# 소스 생성 : 유형 - git, helm, oci, bucket
# flux create source {소스 유형}
# 악분(최성욱)님이 준비한 repo로 git 소스 생성
GITURL="https://github.com/sungwook-practice/fluxcd-test.git"
flux create source git nginx-example1 --url=$GITURL --branch=main --interval=30s
# 소스 확인
flux get sources git
kubectl -n flux-system get gitrepositories
|
cs |
flux 애플리케이션 생성
유형은 kustomization 으로, 깃 소스 경로는( --path ./nginx) 설정하여 어플리케이션 배포를 한다. gitops 웹 대시보드에서 확인할 수 있다.
|
1
2
3
4
5
6
7
8
9
10
|
# [터미널] 모니터링
watch -d kubectl get pod,svc nginx-example1
# flux 애플리케이션 생성 : nginx-example1
flux create kustomization nginx-example1 --target-namespace=default --interval=1m --source=nginx-example1 --path="./nginx" --health-check-timeout=2m
# 확인
kubectl get pod,svc nginx-example1
kubectl get kustomizations -n flux-system
flux get kustomizations
|
cs |
대시보드에서 어플리케이션의 다양한 정보를 확인 할 수 있다.
flux 애플리케이션 삭제
애플리케이션 생성시 prune옵션을 false(default)로 하면 flux 애플리케이션을 삭제해도 pod와 service가 삭제되지 않는다.
|
1
2
3
4
5
6
7
8
9
10
11
12
13
14
15
16
17
18
19
20
21
22
23
24
25
26
27
28
29
30
31
32
|
# [터미널] 모니터링
watch -d kubectl get pod,svc nginx-example1
# flux 애플리케이션 삭제 >> 파드와 서비스는? flux 애플리케이션 생성 시 --prune 옵션 false(default 값)
flux delete kustomization nginx-example1
flux get kustomizations
kubectl get pod,svc nginx-example1
# flux 애플리케이션 다시 생성 : --prune 옵션 true
flux create kustomization nginx-example1 \
--target-namespace=default \
--prune=true \
--interval=1m \
--source=nginx-example1 \
--path="./nginx" \
--health-check-timeout=2m
# 확인
flux get kustomizations
kubectl get pod,svc nginx-example1
# flux 애플리케이션 삭제 >> 파드와 서비스는?
flux delete kustomization nginx-example1
flux get kustomizations
kubectl get pod,svc nginx-example1
# flux 소스 삭제
flux delete source git nginx-example1
# 소스 확인
flux get sources git
kubectl -n flux-system get gitrepositories
|
cs |
5. 애플리케이션 실습 2 (deployment 개수 변경)
Flux 공식 Docs 샘플 실습으로 yaml에서 deployment 개수를 변경하는 실습을 진행합니다.
(Flux 공식 Docs 샘플 실습 - 링크)
Clone the git repository
|
1
2
3
4
5
6
7
8
|
# Clone the git repository : 자신의 Github 의 Username, Token 입력
git clone https://github.com/$GITHUB_USER/fleet-infra
Username for 'https://github.com': <자신의 Github 의 Username>
Password for 'https://herzblue@github.com': <자신의 Github의 Token>
# 폴더 이동
cd fleet-infra
tree
|
cs |
Add podinfo repository to Flux - 샘플
|
1
2
3
4
5
6
7
8
9
10
11
12
13
14
15
16
17
18
19
20
21
|
# GitRepository yaml 파일 생성
flux create source git podinfo \
--url=https://github.com/stefanprodan/podinfo \
--branch=master \
--interval=30s \
--export > ./clusters/my-cluster/podinfo-source.yaml
# GitRepository yaml 파일 확인
cat ./clusters/my-cluster/podinfo-source.yaml | yh
# Commit and push the podinfo-source.yaml file to the fleet-infra repository >> Github 확인
git config --global user.name "Your Name"
git config --global user.email "you@example.com"
git add -A && git commit -m "Add podinfo GitRepository"
git push
Username for 'https://github.com': <자신의 Github 의 Username>
Password for 'https://gasida@github.com': <자신의 Github의 Token>
# 소스 확인
flux get sources git
kubectl -n flux-system get gitrepositories
|
cs |
Deploy podinfo application
podinfo 리포지토리에 있는 kustomize 디렉터리를 빌드하고 적용하도록 Flux를 구성 - 링크
|
1
2
3
4
5
6
7
8
9
10
11
12
13
14
15
16
17
18
19
20
21
22
23
24
|
# [터미널]
watch -d kubectl get pod,svc
# Use the flux create command to create a Kustomization that applies the podinfo deployment.
flux create kustomization podinfo \
--target-namespace=default \
--source=podinfo \
--path="./kustomize" \
--prune=true \
--interval=5m \
--export > ./clusters/my-cluster/podinfo-kustomization.yaml
# 파일 확인
cat ./clusters/my-cluster/podinfo-kustomization.yaml | yh
# Commit and push the Kustomization manifest to the repository:
git add -A && git commit -m "Add podinfo Kustomization"
git push
# 확인
kubectl get pod,svc
kubectl get kustomizations -n flux-system
flux get kustomizations
tree
|
cs |
Watch Flux sync the application
파드 갯수 변경 시도 하면 얼마 안가서 git 저장소에 설정된 replicas 2개로 돌아온다.
|
1
2
3
4
5
6
7
8
|
# [터미널]
watch -d kubectl get pod,svc
# 파드 갯수 변경 시도 >> 어떻게 되는가?
kubectl scale deployment podinfo --replicas 1
...
kubectl scale deployment podinfo --replicas 3
...
|
cs |
삭제 & Github에 fleet-infra Repo 제거
|
1
2
3
4
5
6
|
#
flux delete kustomization podinfo
flux delete source git podinfo
#
flux uninstall --namespace=flux-system
|
cs |
후기
EKS 스터디를 하면서 클라우드에서의 쿠버네티스 워크로드 운영 방법에 대해서 많이 배웠다. 더해서 복잡한 구조와 흐름들을 파악하고 실습하면서 쿠버네티스에 들어가 있는 다양한 개념들을 학습할 수 있었다. 가시다님의 스터디 내용은 이론부터 핸즈온 까지 완벽했다. 이런 빡빡하고 알찬 내용을 매번 준비 해주시는게 너무 감사한 마음이다. 스터디 중간의 팀원 발표에서는 새롭고 너무 유익한 내용을 알 수 있었다.
개인적으로는 복잡한 개념과 내용을 파악하는 연습을 할 수 있던 시간이었던 것 같다. 밤을 새워 내용을 공부하는 것이 힘들기도 했지만, 막바지에 이르니 좀 더 새로운 기술을 도전해보고 익히고 싶은 마음이 커졌다. 다음달까지는 요즘 관심이 가는 DW나 파이프라인 오케스트레이션 툴 같은 [데이터 인프라] 관해서 스터디 해보려고 한다.
'스터디 > Kubernetes' 카테고리의 다른 글
| [AWES] EKS Security - IRSA (0) | 2023.05.31 |
|---|---|
| [AWES] EKS Security - K8S 및 EKS의 인증/인가 (1) | 2023.05.30 |
| [AWES] EKS - Karpenter (0) | 2023.05.28 |
| [AWES] EKS - Autoscaling (0) | 2023.05.27 |
| [AWES] EKS Observability (0) | 2023.05.21 |